Easy Printable Wide Leg Pants Pattern

That’d be pretty cool is somebody created a sewing pattern so you could make an entire closet of these miracle pants right?

You could make them in prints, in medium-weight knits, and even in silks and non-stretch fabrics (as long as the waistband is a stretch-knit to allow for the pull-on waistband to work correctly.
Well ladies, today I’m so crazy excited to finally release a project I’ve been working on for months with you.
Months.
I’ve created this printable sewing pattern and then re-created it again and again, perfecting the size and fit until it was just right.
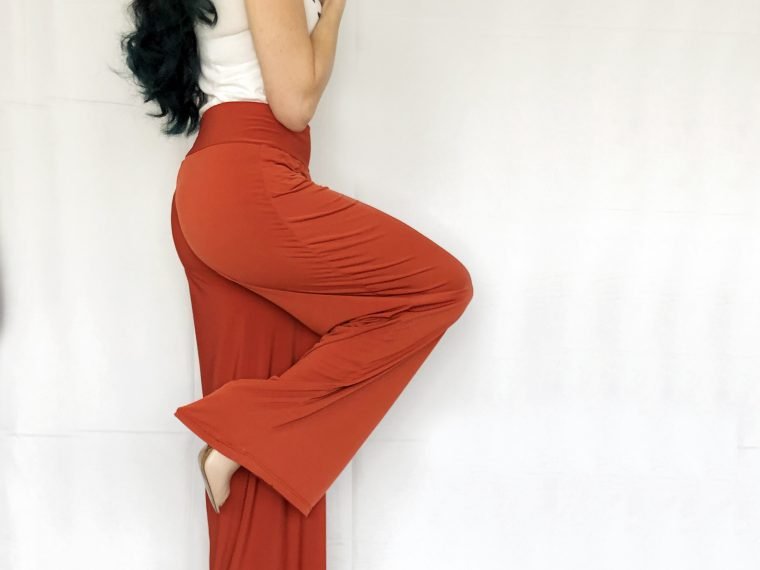
The Perfect Wide-Leg Pants Pattern
This wide leg pant pattern features a wide, stretch waistband that emphasizes your waist while still being incredibly feminine and flattering. stylish and most importantly, comfortable. It lays flat across your waistline with absolutely zero bulk and the most comfortable fit. It’s the perfect balance of comfort and style- ideal for casual wear, work, or even a night out.
Then, the wide leg pant is crazy-comfortable (and very on-trend right now) so you can wear it with tucked in shirts, casual tees, or even a tailored blazer for the office. I designed the legs of these pants to be flowy and breezy to give you the most comfortable fit possible.

Versatility in Fabric Choices
One of my favorite things about this wide leg pants pattern is how versatile it is. You can make these pants in so many different types of fabric:
- Soft, drapey knits for a flowy, bohemian feel.
- Medium-weight knits for a more structured but still comfortable look. This is what I worked with and recommend for beginners.
- Silks and knit-wovens for an elegant, office-ready style (just be sure to use a stretch-knit waistband so they stay pull-on friendly).
- Neoprene or ponte knits for a chic, modern take on the trend.
With the right fabric, these pants can go from casual loungewear to professional attire in an instant.

Why You’ll Love This Pattern
1. Flattering Fit for All Body Types
The wide-leg silhouette is universally flattering, elongating the legs and creating a balanced look. Plus, the high-waisted design enhances the natural waistline without feeling restrictive.
2. Comfort Meets Style
Who says you have to choose between looking great and feeling comfortable? These pants give you both. The stretch waistband ensures a snug but cozy fit, while the wide legs allow for unrestricted movement.
3. Quick and Easy to Sew
Even if you’re a beginner, this pattern is straightforward and easy to follow. You can whip up a pair in just 90 minutes!
4. Customizable for Your Personal Style
Want a boho-chic look? Use a lightweight jersey fabric. Prefer a tailored style? Opt for a structured but slightly stretchy knit. You can even swap out the gathered waistband for pleats to create an entirely different aesthetic!
What’s Included in the Digital Pattern?
This is a printable PDF sewing pattern available for instant download. That means you can print it right at home, cut out the pieces, and start sewing immediately. If you’re new to printable patterns, check out my guide on how to print, use, and store PDF sewing patterns for a seamless experience.
But I think my favorite thing about this wide leg pants pattern is how easy it is to put together. Block out just an hour and a half of your time and you’re good to go. This pattern comes in just a few pieces and is super-straightforward to put together. There’s even a handy little video sew-along just in case you ever get stuck.
So without further ado, are you ready to get started? Snag the printable wide leg pants pattern below and let’s get started!
Wide Leg Pants Pattern Supplies
- Printable Wide Leg Pants Pattern (Click Here To Download)
- 3 Yds Medium Weight Stretch Knit fabric
- Ball Point Sewing Machine Needle
- Twin Stretch Sewing Machine Needle
- Basic Sewing Kit
Video Tutorial:
How To Put Your Wide Leg Pants Together
Step-by-Step Instructions
Step 1: Print and Assemble Your Pattern
Print your pattern on standard printer paper, then cut and tape the pieces together following the included guide. Once assembled, lay it out on your fabric and cut your pieces. You’ll need:
- 2 pant leg pieces
- 1 waistband piece

Step 2: Sew the Pant Legs
1. Take one leg piece and set it aside.
2.Fold the remaining leg piece in half with the right sides together and align the side seams.

3. Pin the side seams together and sew using a serger or a narrow zigzag stitch on a standard sewing machine (use a ballpoint needle for best results).
4. Repeat with the second leg piece.
Now you have two pant legs that resemble long fabric tubes!
Step 3: Sew the Crotch Seam
1. Turn one pant leg right side out and place it inside the other pant leg (which should still be inside out).
2. Align the crotch seam, pin, and sew, working your way from the back center to the front center.
3. Turn the pants right side out—your pants are now taking shape!

Now that your project is beginning to resemble pants..
Step 4: Create and Attach the Waistband

1. Take your waistband piece and fold it in half “hamburger” style (short ends together). Sew the short ends to create a tube.
2. Fold the tube in half again, this time lengthwise, so the raw edges are together.

3. Mark the center front, center back, and side seams of the waistband using pins (this technique is called the “quartered off” method). Place a pin at the stitch-line. This will mark your center back. Then, stretch your waistband tube in either direction to find the exact opposite side. Place a pin here to mark the center front. Next, hold your waistband on either side and stretch to pull the two needles together, finding the location of your side seams. Pin to mark.
If this step is at all confusing, just watch the video tutorial above for a detailed explanation.
4. Do the same with the pants’ waist opening.

5. Pin the waistband to the pants, matching the quartered markings. Now that your waistband is marked with center back, center front, and side seams, it’s time to match those points up with your pant legs. Pin in place.
6. Sew while stretching the waistband slightly to fit. This ensures a snug but comfortable fit at the waist. This will create the gathered look at the top of your wide leg pants and a fitted waistline.
Step 5: Hem the Pant Legs
To finish off your new pants, turn up the bottom hem of each leg about 1 inch, pin in place, and sew using a twin stretch needle for a clean, professional finish. You can also just pin and use the zig zag stitch, it’s all about your preference of look here.

Now comes the best part! You get to wear, love, wash and repeat!
Styling Your New Wide-Leg Pants
Now that you have your perfect pair of wide-leg pants, here are some ways to style them:
- Casual Chic: Pair with a simple tucked-in tee and sneakers.
- Work-Ready: Add a tailored blazer and heels.
- Boho Vibes: Wear with a flowy blouse and sandals.
- Lounge Mode: Throw on an oversized sweater for ultimate comfort.
Experimenting with Variations
Once you’ve mastered the basic pattern, try these fun modifications, or dream up others! I’ve created this wide leg pant pattern in medium-weight knits, lightweight ITY jersey, and even neoprene fabrics. (You can check out my sewing tips on working with neoprene here)
- Pleated Waistband: Swap the gathers for pleats for a more structured look.
- Cropped Length: Shorten the legs for breezy culottes.
- Slits: Add side slits for extra movement and a bit of flair.
- Elasticized Ankles: Create jogger-style pants by adding elastic cuffs at the bottom.
Any way you want it, this printable sewing pattern is super simple to put together and has never let me down. I’m so excited to be able to share it with you!
![]()
Final Thoughts
Sewing your own wide-leg pants is such a rewarding experience—you get a custom fit, unlimited fabric choices, and the satisfaction of wearing something you made yourself. Whether you’re making your first pair or adding new variations to your collection, this pattern is sure to become a staple in your handmade wardrobe. I know it has in mine!
I can’t wait to see what you create! Be sure to tag me in your photos on social media and share your beautiful handmade pants. Happy sewing!